---
title: "Connecting vendor Stripe accounts"
description: "Connect vendor Stripe accounts with Split Pay onboarding, the front-end shortcode, Connect Status links, manual Stripe onboarding, or Stripe Connect OAuth for an existing account, and choose Standard or Express for new Split Pay-created accounts."
url: "https://docs.splitpayplugin.com/features/connecting-vendor-stripe-accounts/"
---
## Overview
Before Split Pay can transfer funds to a vendor, that vendor must have a Stripe account connected to your platform. There are four ways to connect vendor accounts:
1. **Split Pay onboarding** PRO — A built-in registration and onboarding flow on your site’s standard WordPress registration page.
2. **Front-end shortcode** — The `[split_pay_vendor_connect]` shortcode renders a “Connect with Stripe” button on any page so vendors can onboard without touching wp-admin.
3. **Stripe Dashboard onboarding** — Manually create connected accounts through your Stripe Dashboard and share an onboarding link.
4. **Connect an existing Stripe account** — Connect an account that already exists to your platform with Stripe Connect OAuth, from **Connect Status**.
Once vendors can connect, Split Pay can make the rest hands-off — auto-create a product, give each vendor a payment QR code, email vendors after successful transfers, and send customers one confirmation when their order’s money is sent. See [Vendor Automation](../vendor-automation/) PRO.
* * *
## Method 1: Split Pay onboarding PRO
The Pro version includes a self-service onboarding flow that lets vendors register and connect their Stripe accounts without you needing to touch the Stripe Dashboard.
### Enable vendor onboarding
Navigate to **Split Pay → Vendor Onboarding** in WordPress admin.
If the page asks you to connect your Stripe platform account, first save at least one usable Test or Live platform key under **Split Pay → Integrations**. This opens the onboarding controls; each actual onboarding action still uses the key for its selected Test or Live mode.
Check the **Enable Vendor Onboarding** checkbox.

Enable Vendor Onboarding in Split Pay Plugin Settings
Choose **Vendor account type**: **Standard** (default) or **Express**. This saved choice is the default whenever Split Pay creates a new account through its built-in onboarding, front-end shortcode, or a Connect Status onboarding link. Developer code using the `spp_account_create_args` filter can override it. See [Vendor account types](../vendor-account-types/).
Save your settings.
When enabled, the plugin creates a **Vendor (Split Pay Plugin)** WordPress user role and adds a **Register as a Vendor** checkbox to your site’s existing WordPress registration page. No new page is created.
WordPress opens that registration page only when **Anyone can register** is checked under **Settings → General → Membership**. If your site keeps public registration off, add vendors yourself as described in [Managing vendors](#managing-vendors).
### Vendor registration flow
Once onboarding is enabled, vendors can self-register:
The vendor visits your site’s standard WordPress registration page (e.g. `/wp-login.php?action=register`). The plugin adds a **Register as a Vendor** checkbox to this existing page — no new page is created in your Pages list.
They create a WordPress account with the **Vendor (Split Pay Plugin)** role.
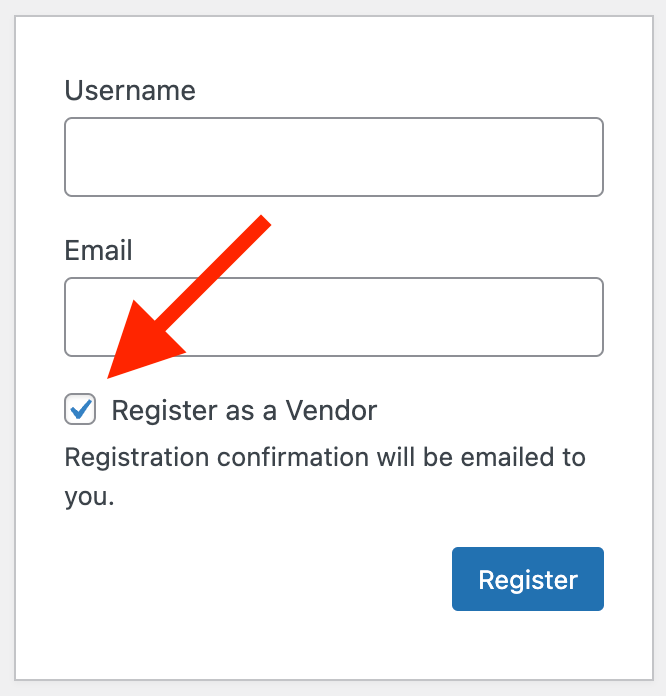
Register as Vendor on WordPress Registration Page
After logging in, they’re guided through the Stripe Connect onboarding process — creating or connecting their Stripe account to your platform.
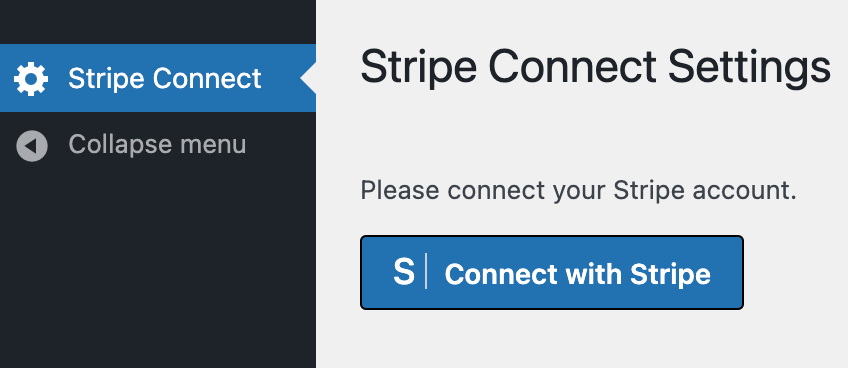
Stripe Connect Settings in Vendor Dashboard View
Once onboarding is complete, Split Pay saves their Stripe account ID in this site’s Test or Live vendor-connection record.
**Hands-off setup:** With the Pro onboarding flow, vendors handle their own Stripe account creation and verification. You don’t need to manage account links or share onboarding URLs manually.
### Additional vendor roles
In the **Vendor Onboarding** settings tab, the **Additional Vendor Roles** multi-select lets you grant any WordPress role access to the Stripe Connect onboarding page. This is useful when your site already has custom roles (for example, “Seller,” “Artist,” or “Partner”) and you want those users to connect their Stripe accounts without changing their existing role.
### Vendor instructions: title and description
You can show vendors your own instructions next to the Stripe Connect button. On the **Vendor Onboarding** tab, with vendor onboarding enabled, check **Enable Title & Description.**, enter a **Title** and a **Description**, and save. Vendors see them at the top of their **Stripe Connect** page in WordPress admin, above the button to connect their Stripe account. Vendors land on that page when they log in.
If the option is off or a field is blank, vendors see the default heading **Stripe Connect Settings** and the default text **Please connect your Stripe account.** Both fields are plain text. Keep them short, for example a title of `Stripe Connect Settings` and a description such as `Please connect your Stripe account. Contact us at you@example.com with any questions.`
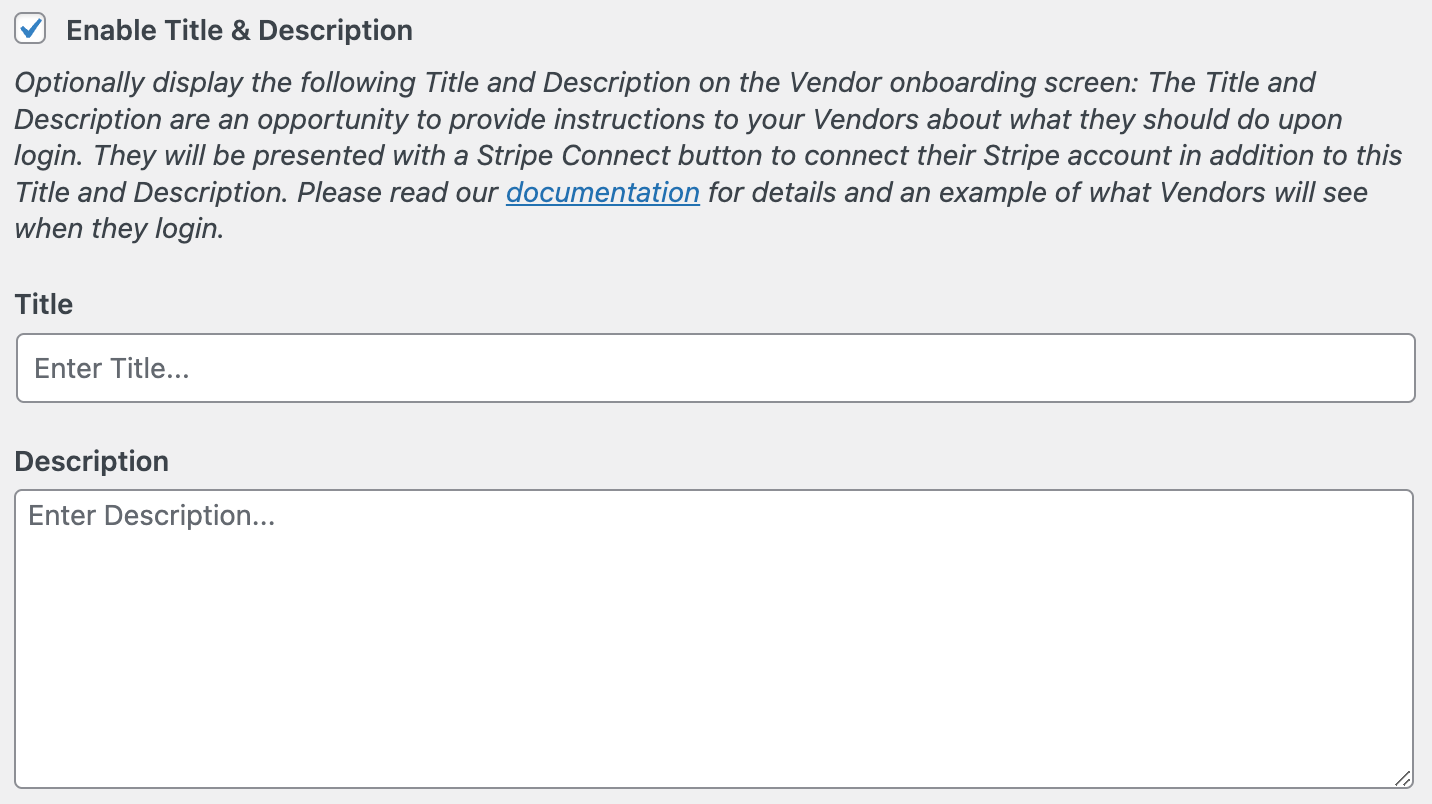
Vendor Instructional Title and Description
### Managing vendors
Vendors who registered through the built-in flow appear in your WordPress **Users** list with the **Vendor (Split Pay Plugin)** role. Use **Connect Status** to verify the exact connected-account ID and Stripe mode before configuring product-level transfers.

Confirm the exact Test and Live account pair in Connect Status.

Until at least one Test account and one Live account are synced, the card shows this message instead of the pairing controls. Click **Refresh from Stripe** in each mode first.
New onboarding and strict identity routing use exact, site-scoped Test/Live pairs. Until an administrator confirms an exact pair or completes a strict platform-key replacement, a site can keep resolving saved recipients by email, then name, then saved account ID.
You can also add a vendor yourself, which is the way to do it when your site does not allow public registration. With vendor onboarding enabled, go to **Users → Add New User**, enter the vendor’s details, and choose the **Vendor (Split Pay Plugin)** role. When that vendor logs in, they land on the same **Stripe Connect** page to connect their account.
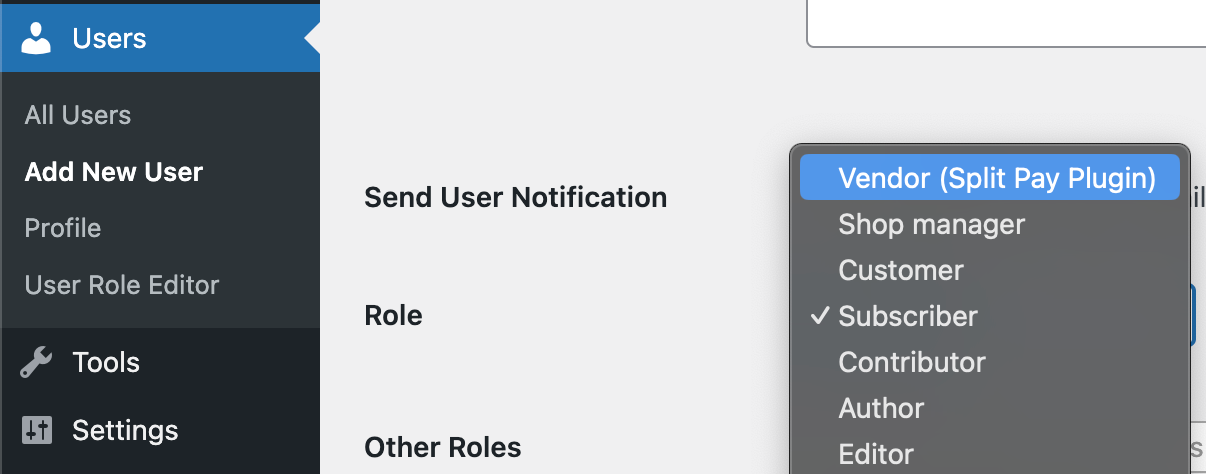
Adding Vendor Role in WordPress Users Section
* * *
## Method 2: front-end vendor onboarding shortcode
The `[split_pay_vendor_connect]` shortcode renders a Stripe Connect onboarding button on any public page. Vendors can start or resume onboarding without you exposing the WordPress registration page or admin dashboard. The shortcode works on a WooCommerce site, a FluentCart site, or a hybrid site, in both Free and PRO.
To copy it, open **Split Pay → Vendor Onboarding**. The **Vendor sign-up shortcode** box shows `[split_pay_vendor_connect]` once Split Pay finds a Test or Live platform secret key, for example one saved on the Integrations tab. Until then, the tab asks you to connect your Stripe platform account. Accounts vendors create through the shortcode use the Stripe mode shown on the Vendor Onboarding tab. Use the shortcode for a permanent sign-up page: the links in the **Connect links (share with vendors)** card on Connect Status expire 7 days after that page is loaded. On a Stripe platform that allows only Accounts v2, the generic links there work only for a vendor who is signed in to your site; see [Known limitations](../../support/troubleshooting/#limit-accounts-v2-generic-link).
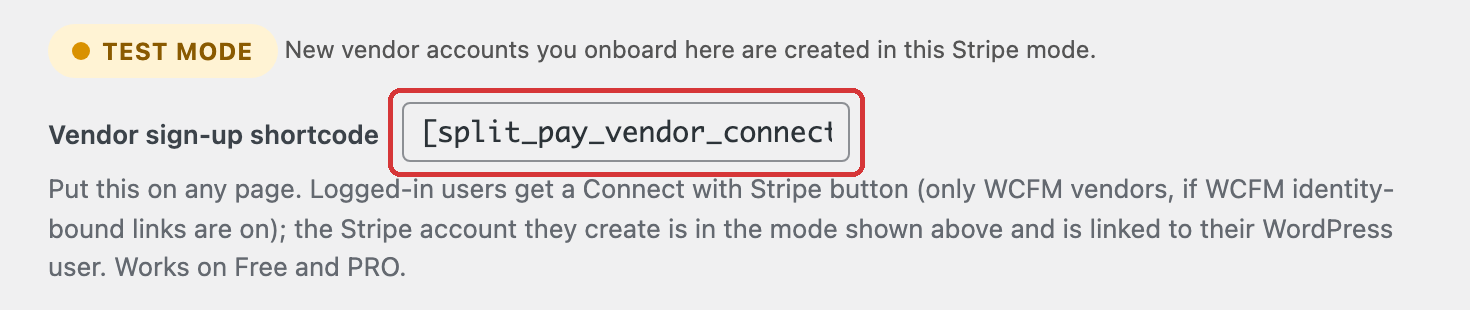
Copy the shortcode from the **Vendor sign-up shortcode** box. The badge above it shows the Stripe mode new vendor accounts are created in.
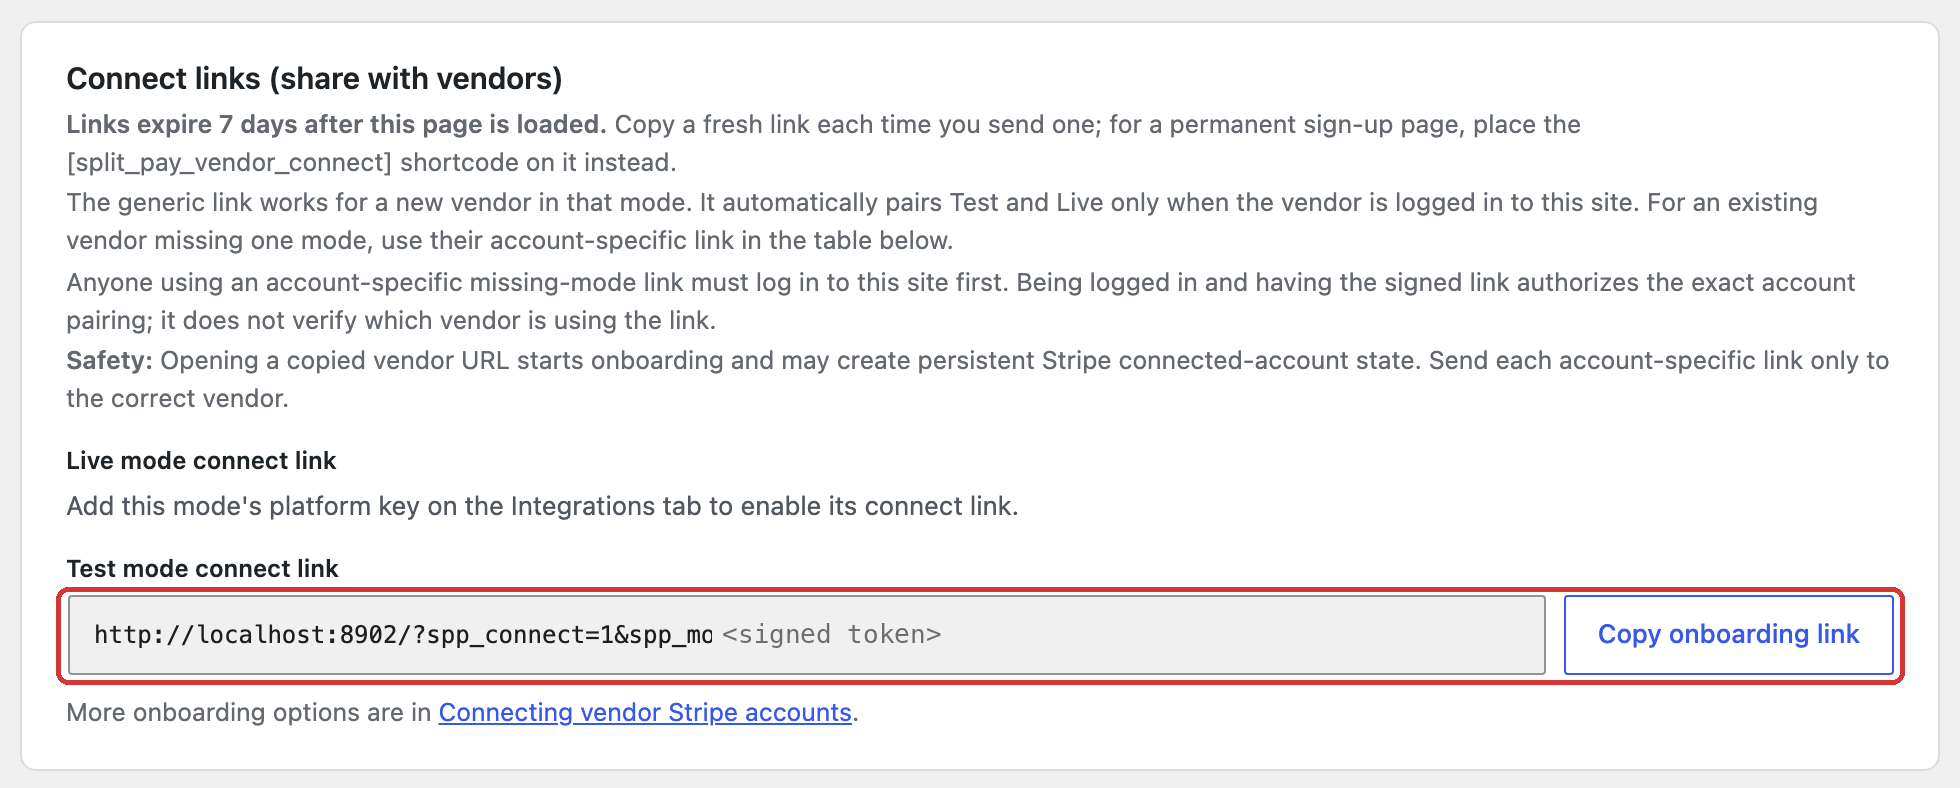
The **Connect links (share with vendors)** card on Connect Status. A mode’s link appears once that mode’s platform key is saved on the Integrations tab. Copy a fresh link each time you send one.
The shortcode reuses the same Stripe Connect account and account-link flow as Method 1. Once a vendor completes onboarding, Split Pay stores the account ID in this site’s mode-specific connection record and can route transfers to it.
### Syntax
Drop the shortcode into any post, page, widget, or template that accepts shortcodes:
```
[split_pay_vendor_connect]
```
All four attributes are optional. You can override any subset:
```
[split_pay_vendor_connect
button_label="Become a Vendor"
connected_label="Your Stripe account is connected."
login_label="Please log in to connect your Stripe account."
pending_label="Stripe onboarding is in progress. Complete the steps with Stripe to finish."]
```
### Attributes
| Attribute | Default | Shown when… |
| --- | --- | --- |
| `button_label` | “Connect with Stripe” | The vendor is logged in but has not started Stripe onboarding yet. Becomes the call-to-action label on the connect button. |
| `connected_label` | “Your Stripe account is connected.” | This site’s mode-specific connection record contains the Stripe account ID and marks that same account as onboarded. |
| `login_label` | “Please log in to connect your Stripe account.” | The visitor is not logged in. The shortcode also renders a “Log In” button that returns them to this page after sign-in. |
| `pending_label` | “Stripe onboarding is in progress. Complete the steps with Stripe to finish.” | The vendor has a Stripe account ID stored but onboarding hasn’t been completed. A **Resume Stripe Onboarding** button is shown alongside this message. |
### Runtime states
The shortcode renders one of four states based on the current user:
1. **Logged out** — `spp-vendor-connect spp-vendor-connect--logged-out` wrapper. Shows `login_label` and a Log In button.
2. **Logged in, no Stripe account yet** — `spp-vendor-connect spp-vendor-connect--connect` wrapper. Shows the primary `button_label` button. Clicking it creates the Standard or Express account selected under **Vendor account type** by default, generates an account link, and redirects the vendor to Stripe’s hosted onboarding.
3. **Logged in, onboarding pending** — `spp-vendor-connect spp-vendor-connect--pending` wrapper. Shows `pending_label` and a **Resume Stripe Onboarding** button that re-opens the existing Stripe account link.
4. **Logged in and connected** — `spp-vendor-connect spp-vendor-connect--connected` wrapper. Shows `connected_label`, an optional payment QR code when enabled, and a **Disconnect Stripe account** button.
You can style any of these states using the wrapper class names listed above.
### Where to place it
* A dedicated **Become a Vendor** landing page on your site.
* The vendor’s profile or dashboard page (an account-area template).
* Inside a sidebar widget on pages where you want to recruit vendors.
* Anywhere the standard WordPress shortcode runner is invoked — including FluentCart product pages, WooCommerce account pages, and Gutenberg/Classic-Editor content.
### Required capabilities and configuration
* **Visitor:** by default, any logged-in WordPress user can use the connect button; the shortcode does not require the Vendor (Split Pay Plugin) role. If the optional identity-bound WCFM Connect flow is enabled, it instead requires an authorized, signed-in WCFM vendor.
* **Site administrator:** Save the mode-matched Stripe platform secret key on **Split Pay → Integrations**. If Split Pay cannot resolve a key for that mode, the connect action returns “Stripe is not yet configured by the site administrator” and creates no account.
* **HTTPS:** Stripe Connect onboarding URLs only function over HTTPS. Make sure your site is served with a valid TLS certificate before pointing vendors at the page.
### Example
A minimal “Become a Vendor” page might contain:
```
Join the marketplace
Sign up and connect your Stripe account to start receiving payouts.
[split_pay_vendor_connect button_label="Become a Vendor"]
```
On the same page you can customise the messaging for other states without changing markup:
```
[split_pay_vendor_connect
button_label="Connect Stripe"
connected_label="You’re all set — payouts will land in your Stripe account."
login_label="Log in to start your vendor onboarding."
pending_label="Almost there — finish your Stripe verification."]
```
### Operational notes
* Connect actions open Stripe’s hosted onboarding on `connect.stripe.com`, also when Split Pay creates an Accounts v2 account because your platform refuses Accounts v1 account creation (see [Known limitations](../../support/troubleshooting/#limit-accounts-v2-onboarding)). Allow this Stripe domain in any security plugin that restricts redirects, and don’t whitelist a different domain.
* Each connect action carries a one-time nonce (`_spp_connect_nonce`). Don’t cache the page output too aggressively or vendors may receive an “Invalid request” error if the nonce expires before they click.
* New accounts created by the shortcode, a Split Pay Connect link, or built-in/admin onboarding use the saved **Vendor account type** setting by default. Standard is the default. A saved choice is honored, and developer code can override the creation arguments. Changing the setting does not convert an account that already exists. On a Stripe platform that refuses Accounts v1 account creation, a new account gets the Express Dashboard even when the setting is Standard. See [Vendor account types](../vendor-account-types/).
* * *
## Method 3: Stripe Dashboard onboarding
With the free version (or if you prefer manual control), you can create connected accounts directly through the Stripe Dashboard.
Log in to your [Stripe Dashboard](https://dashboard.stripe.com/).
Navigate to **Connect → Accounts** (or **More → Connect** depending on your dashboard layout).
Click **Create** to add a new connected account.
Choose the account configuration based on your needs. Stripe’s legacy Accounts v1 framing uses **Standard**, **Express**, and **Custom** presets plus controller properties. Accounts v2 instead uses configurations, a `dashboard` value, and `defaults.responsibilities` to define capabilities and responsibility.
Either model can receive Split Pay transfers only when the account is connected to this platform and its transfer capability is active; for Accounts v2, that capability is `stripe_balance.stripe_transfers`. The configuration also controls Dashboard access and who is responsible for fees, losses, and requirement collection — not only the onboarding screen. See Stripe’s [connected-account configuration](https://docs.stripe.com/connect/accounts-v2/connected-account-configuration) and [Accounts v2](https://docs.stripe.com/connect/accounts-v2) references.
Stripe generates an **onboarding link**. Send this link to your vendor so they can complete their account setup.
Once the vendor completes onboarding, return to **Split Pay → Connect Status** and use **Refresh from Stripe**. Confirm that the exact `acct_...` account appears and is ready in the intended Test or Live mode.
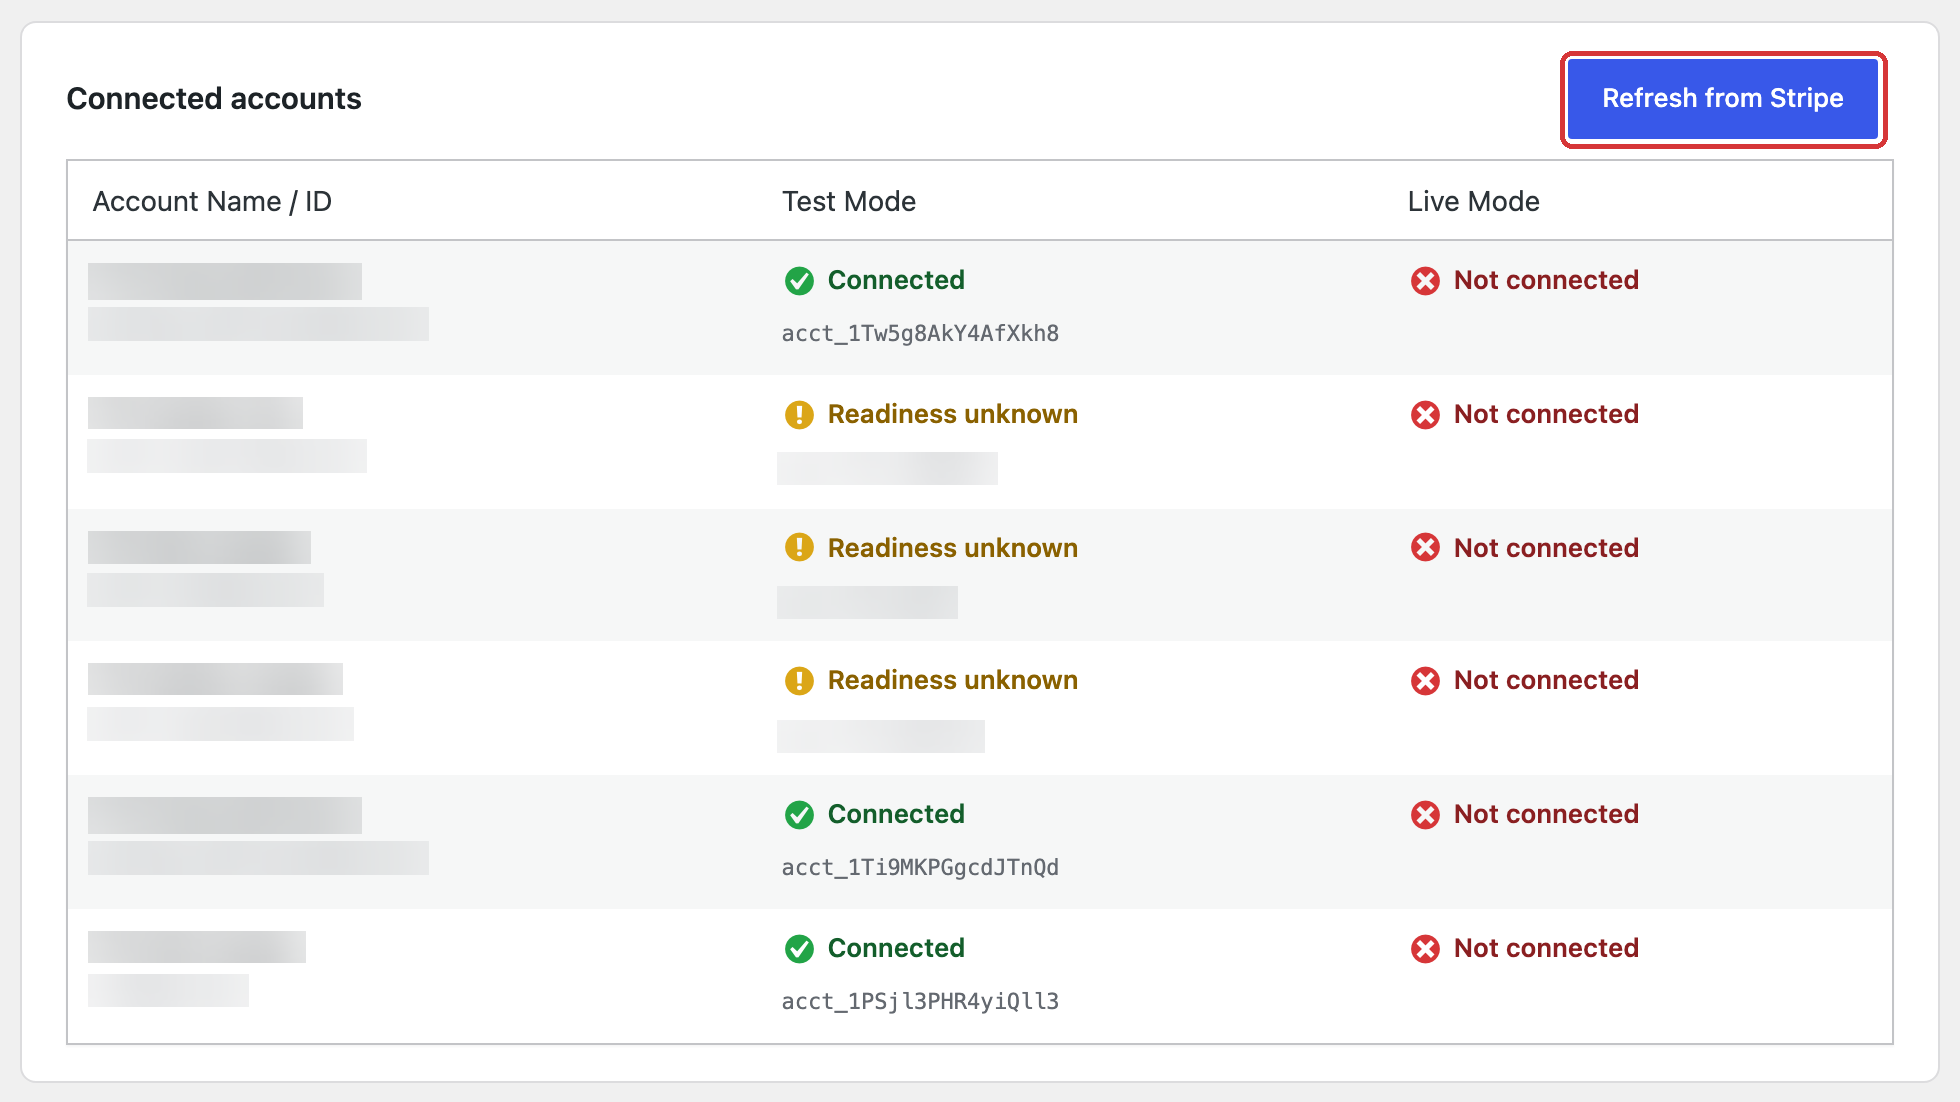
Click **Refresh from Stripe**, then read the account’s status for each mode: **Connected**, **Onboarding incomplete**, **Readiness unknown** or **Not connected**. Names, emails and test IDs are blurred here.
In Free, select the synced account as the global recipient. With PRO, you can also select it in individual product or variation rules.
For testing, use Stripe’s **test mode** connected accounts. Toggle between test and live mode in your Stripe Dashboard to manage test accounts separately.
* * *
## Method 4: connect an existing Stripe account
The onboarding flows and Connect links above always create a new Stripe account. To connect an account that already exists — for example your own Stripe account, or a vendor’s account made outside Split Pay — use the **Connect an existing Stripe account** card on **Split Pay → Connect Status**. It uses Stripe Connect OAuth for Standard accounts. The card appears once a platform secret key is saved, and only site administrators can use it.
In Stripe, open **Settings → Connect → Onboarding options → OAuth**, turn on OAuth for Standard accounts, and add the redirect URI shown on the card in both Test and Live mode. It has the form `https://example.com/wp-admin/admin-post.php?action=spp_oauth_connect_return`.
Copy the Test and Live client IDs (they start with `ca_`) from the same Stripe page, paste them into **Test client ID** and **Live client ID**, and click **Save client IDs**.
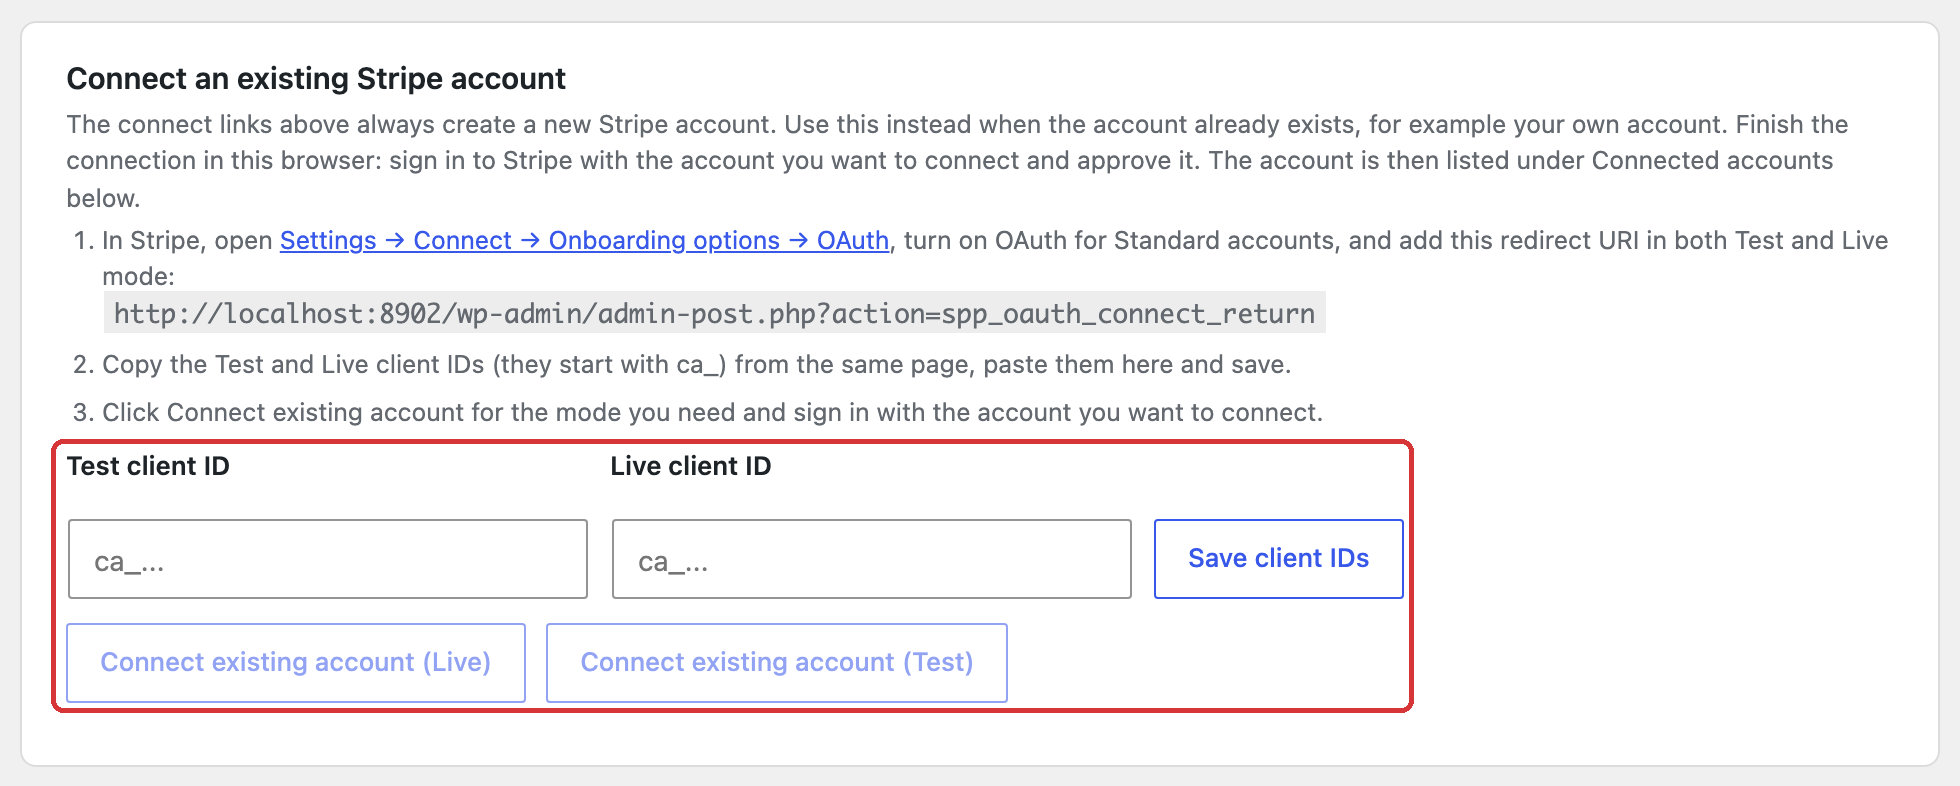
The card shows this site’s redirect URI. The **Connect existing account** buttons stay greyed out until that mode’s client ID is saved.
Click **Connect existing account (Test)** or **Connect existing account (Live)**. Each button needs that mode’s client ID and platform secret key.
In the same browser, sign in to Stripe with the account you want to connect and approve the connection.
Back on Connect Status, Split Pay refreshes the account list and confirms the connection, for example **Connected … in Test mode. It is listed under Connected accounts below and can now be chosen as a recipient.** To pay a WCFM vendor through that account, link the vendor on the WCFM card; see [Link a vendor to an existing Stripe account](../integrations-and-compatibility/wcfm-marketplace/#link-existing-account).
Each connection you start is valid for 30 minutes and can be used once. Split Pay refuses a Stripe response that was already used, has expired, or was started by another administrator, with **This Stripe response expired or was not started from this site. Start the connection again.** If Stripe connects an account in the other mode, Split Pay asks you to start again from the matching Test or Live button. If the account doesn’t appear yet, click **Refresh from Stripe**.
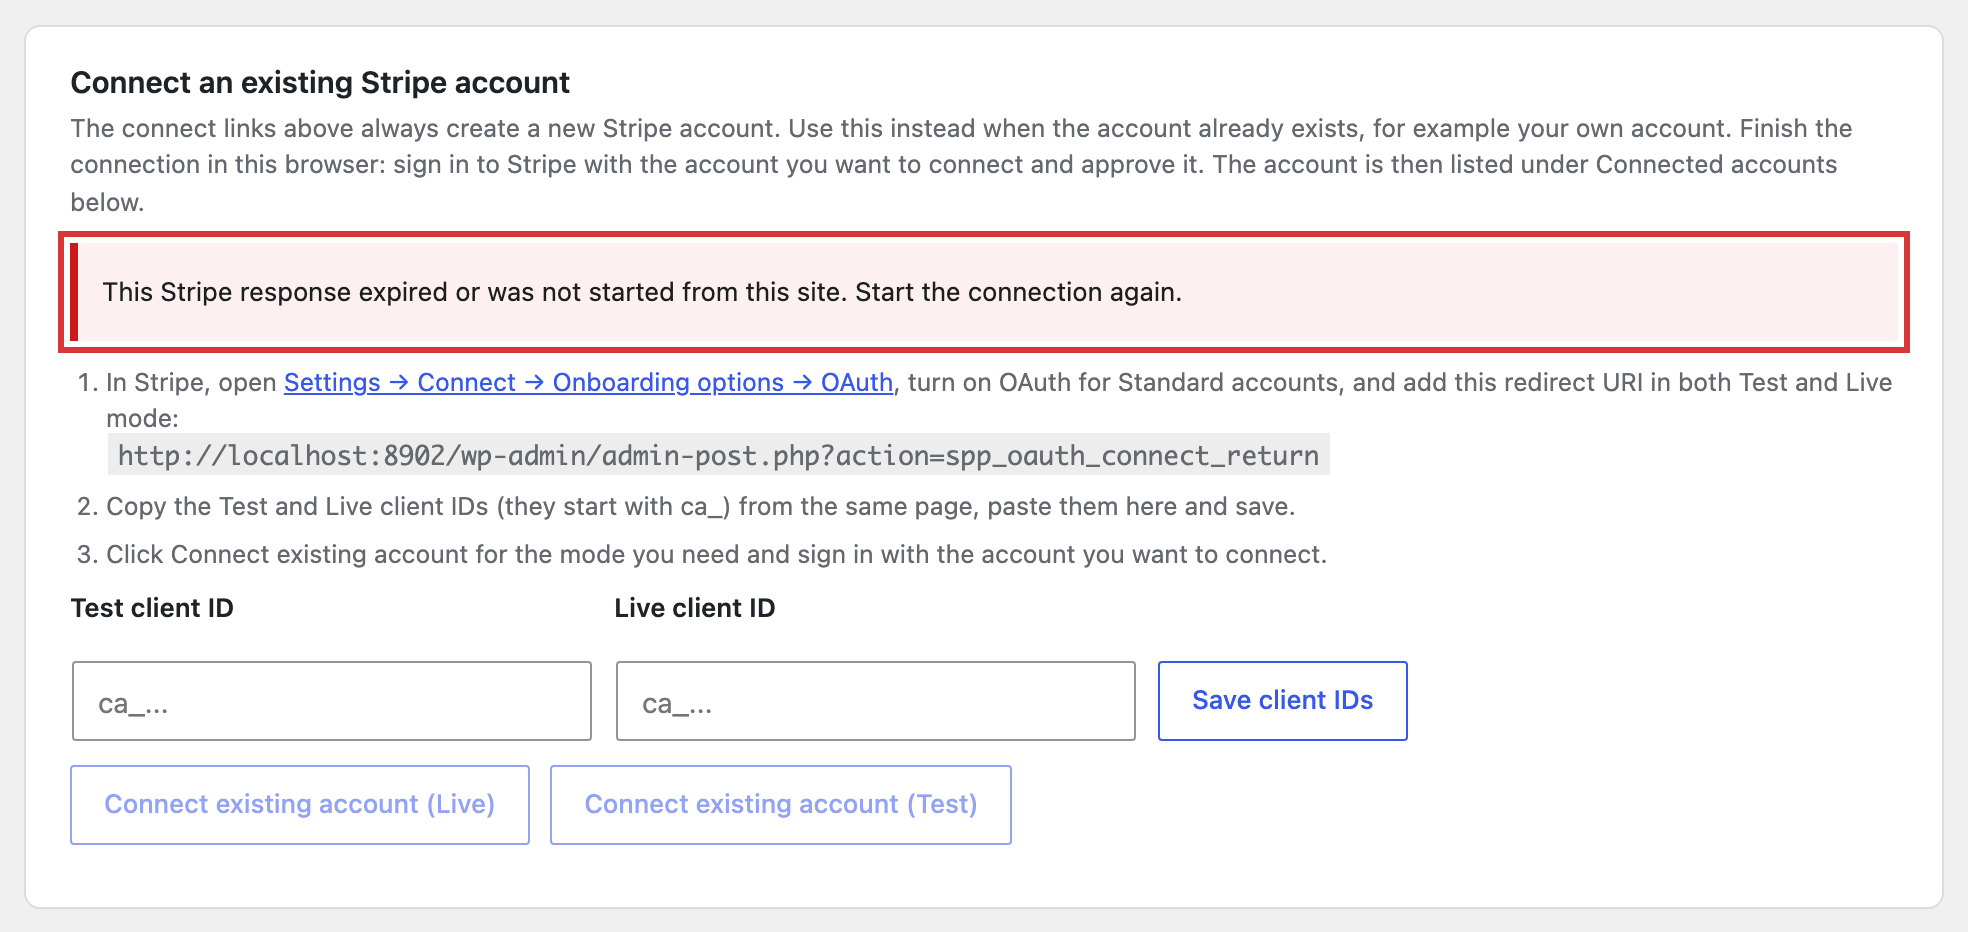
A refused Stripe response shows at the top of the card. Start the connection again from the Test or Live button.
## Account requirements
Regardless of which method you use, connected accounts must meet these requirements before they can receive transfers:
* The account must have **completed Stripe onboarding** (identity verification, banking details, etc.).
* The account must be **enabled for transfers** — Stripe may require additional verification for some account types or countries.
* The account must be connected to **your platform’s Stripe account** (not a different platform).
* **Stripe controls cross-border eligibility.** Split Pay does not treat a fixed list of countries as a guarantee. Verify a different-country platform/account pairing in Stripe and with a Test order before using it in Live mode.
**Test vs. Live:** A recipient verified only in Test is not proven ready for Live, and vice versa. The same exact `acct_` ID can be valid in both modes, but verify its readiness separately for each mode in **Connect Status**.
## Accounts Split Pay has stopped paying
When Stripe reports that a connected account was disconnected from your platform, Split Pay stops paying it. Every transfer to that account is skipped without a request to Stripe, and the order note ends with `FAILED: destination account deauthorized by Stripe`. The account appears on **Split Pay → Platform Status** in the **Vendor accounts Split Pay has stopped paying** card, which appears while at least one account is blocked.
Split Pay adds an account to this list only when Stripe’s `account.application.deauthorized` event reaches your store at the WooCommerce Stripe gateway’s webhook URL and is signed with the webhook signing secret saved in the WooCommerce Stripe settings for the gateway’s current Test or Live mode. An event signed with any other endpoint’s secret is ignored. If Stripe later sends `account.application.authorized` for the account the same way, Split Pay removes it from the list. If these events don’t reach your store, the list stays empty and Split Pay keeps attempting transfers to the account.
To start paying a blocked account again:
Ask the vendor to reconnect their Stripe account to your platform. Then open **Connect Status**, click **Refresh from Stripe**, and confirm the account is ready in the right mode.
On **Platform Status**, click **Unblock** next to the account and confirm.
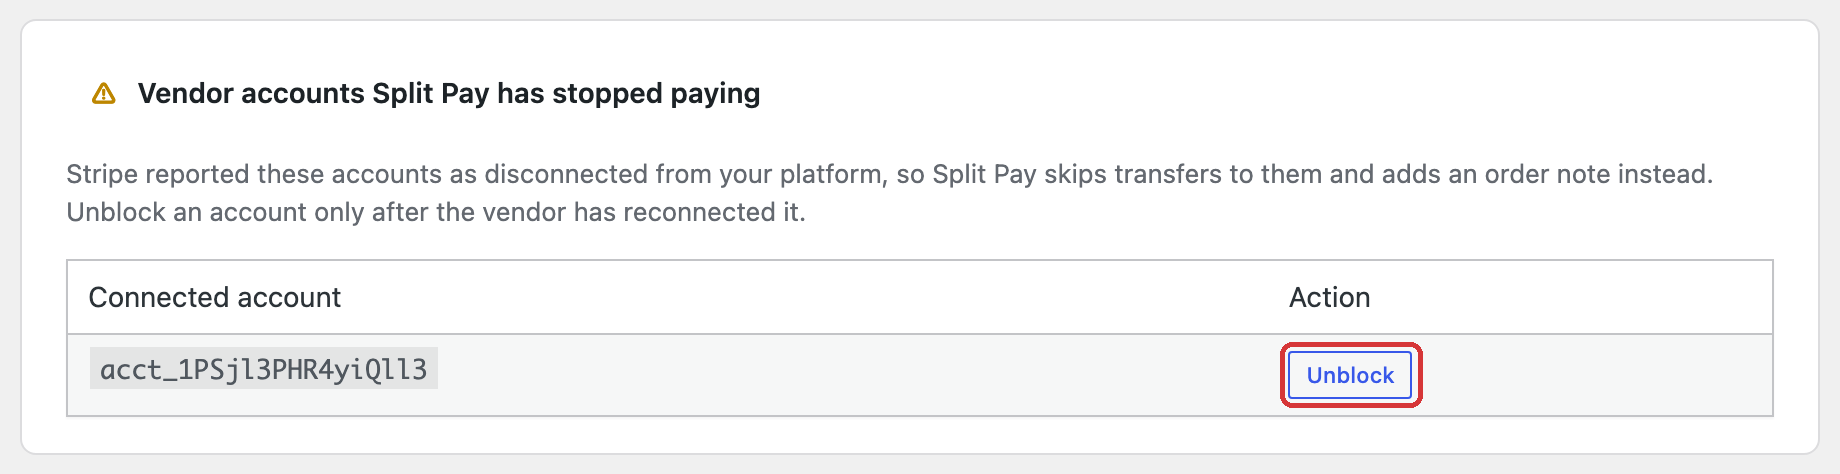
The card lists each account Stripe reported as disconnected, with an **Unblock** button.
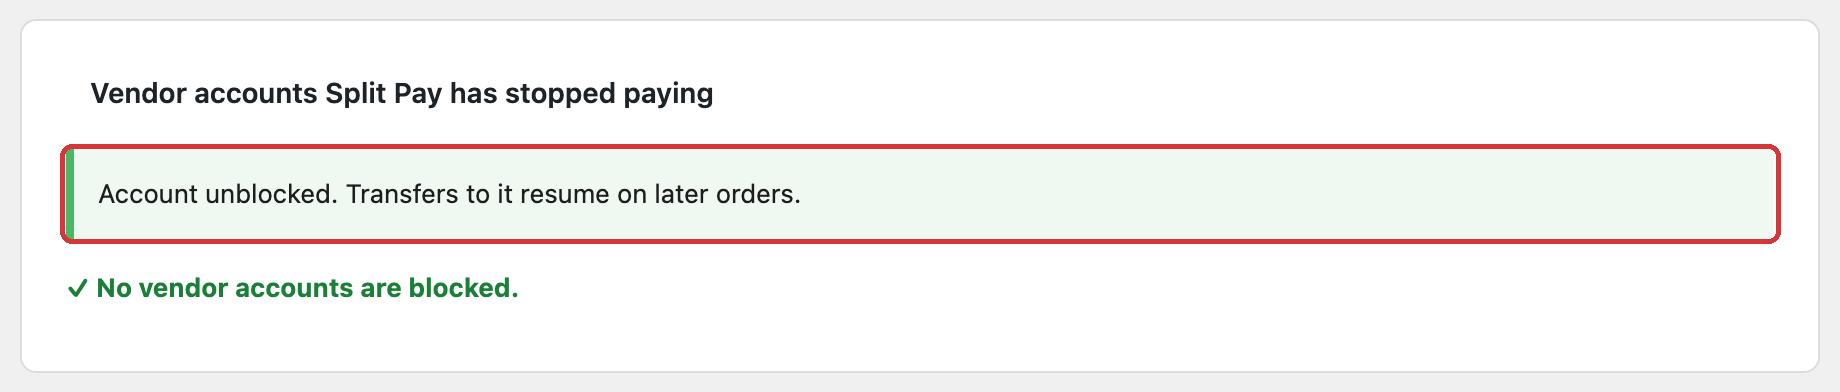
After you unblock the last account, the card confirms it and shows **No vendor accounts are blocked.**
**Unblock** only takes the account off the list — it moves no money. Transfers to the account resume on later orders. For a WooCommerce order that already failed while the account was blocked, use **Retry Split Pay Transfers**, unless you already paid that vendor by hand in Stripe. Only site administrators can unblock an account, and the card lists up to 50 accounts.
## Finding the Stripe account ID
Every connected Stripe account has a unique identifier that starts with `acct_`. You can find it in:
* **Stripe Dashboard:** Go to Connect → Accounts, click on the account, and the ID appears at the top of the page.
* **Vendor user profile on a single-site install:** Split Pay mirrors the site connection there for compatibility. On multisite, use **Connect Status** or Stripe Dashboard instead because Split Pay does not write site identity into network-shared user metadata.